Pattern Alterations for the Lotus Pattern
As we celebrate the launch of our first pattern, we’ve lined up a few tutorials geared toward getting the perfect fit in the Lotus Pattern.
In general, due to the Lotus utilizing non-stretch fabric in both cups and cradle, you will find applying your “usual” underwired bra pattern alterations works quite well. What are some “usual” bra pattern alterations?
Moving the bra strap attachment point
Adding/Removing some length in the band
Raising or lowering the underarm side seam height
Adding a dart (or two) in the cup to reduce volume
Adding/Removing some length in the Bottom Cup Depth for more/less projection
Narrowing/Widening the center gore in the cradle
***[for quick primer on Breast Anatomy click HERE]***
Today’s topic is how to narrow or widen the center gore of the cradle. For those who are narrow set, this alteration requires a slight change in the sewing instructions. There are no sewing changes for those who are wide set.
HOW TO NARROW THE CENTER GORE
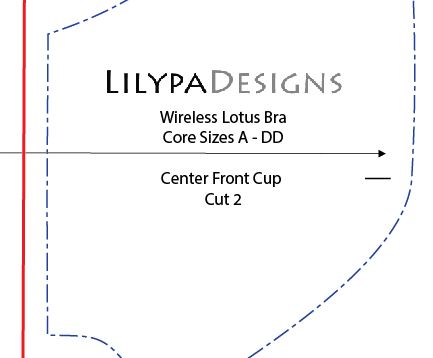
New seam line indicated by the Red Line.
Determine how much you need to narrow. Print out 2 copies of the cradle and remove the seam allowance. Hold up the pattern and note now much the 2 pattern pieces overlap.
Using HALF of the measurement, draw a new seam line parallel to the fold line. Then ADD a seam allowance (6mm or 1/4”) to the new seam line.
Remove the same amount from the Center Front Cup. No need to worry about the seam allowances as it is already included here.
ALTERNATE SEWING DIRECTIONS FOR NARROWING CENTER GORE
Step 1 - remains the same
Step 2 - skip
Step 3 - With rights sides together, sew each cup to matching cradle piece while keeping marks aligned. There should a left cup+cradle and right cup+cradle.
With right sides up, top stitch or 3-step zig zag along the seam making sure to catch the seam allowance. Seam allowance should be folded toward the bottom. Trim excess or if using channeling, skip to optional step.
Step 3b - With right sides together, sew left cup to right cup along the center seam through the cradle. Iron the seam allowance open and with right side up, top stitch or 3-step zig zag along the seam making sure to catch the seam allowance. Trim excess allowance.
HOW TO WIDEN THE CENTER GORE
New Fold Line indicted by the red line.
Determine how much you need to widen. Print out 2 copies of the cradle and remove the seam allowance. Hold up the pattern and note the width of the gap between the 2 pattern pieces.
Using HALF of the measurement, draw a new fold line parallel to the original fold line.
Add the same amount from the Center Front Cup.
That’s it! No changes to the sewing instructions or seam allowances.
Join our Facebook Group for more tutorials, tips and exclusive discounts! https://www.facebook.com/groups/LilypaDesignsPatternGroup/


