TUTORIAL - Drafting Omega Shaped Bra PREVIEW
Just a quick post today to give a preview on what I’ve been working on. Custom drafting a bra pattern for someone who is distinctly omega shaped. For the most up to date info on Omega Shape Adjustments see [HERE].
While there are a few tutorials floating around on the internet on how to alter bra patterns to fit Omega shaped breasts [HERE and HERE], I have not found ANY that addressed how to incorporate the Omega shape into the initial draft.
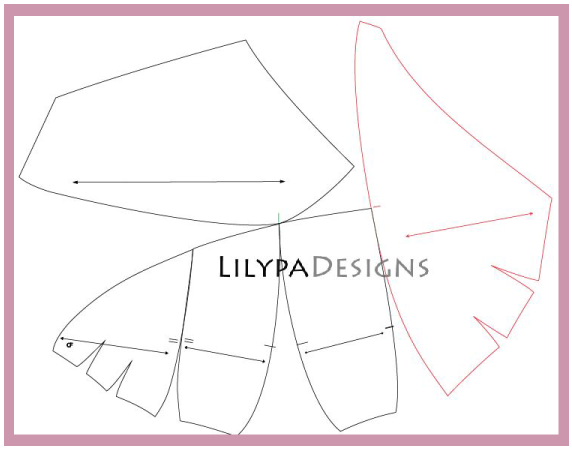
Below is a screenshot of the custom pattern for someone who is roughly a 32KK (UK) based on their cross seam but a 32HH (UK) based on wire size and bottom cup depth. That’s a 6 size difference! This being the case, I knew the common (ie. EASIER) method of gathering the cup along the wireline was NOT going to cut it and needed a plan.
THE PLAN
Knowing full well that a simple cup layout + gathering was not going to be enough in this instance. I dove in with my eyes wide open. Planned for a multi-seamed cup - 4 section lower cup and 1 upper to minimize the number of mini darts I would need. This provided 5 areas in which I can incorporate a mini dart with a seam. To keep things easy, each dart would be 1 cm wide by 2.5 cm tall. All I had to do was determine the difference in length at the wireline between the larger cup size and the smaller cradle size. The number of centimeters indicated the number of darts I would need. In the case above, I needed a 7 cm reduction - 5 of which were “invisible” at the seams. The remaining 2 darts were placed on the larger pieces (near CF and UA).
FITTINGS
The initial draft was a decent starting point. Volume and wire was correct with minor wrinkles and some East/West action. Bra style was quickly changed into a multi-seamed bra with a powerbar and internal slings after the first fitting. A stronger, larger gauge vertical underwire made quite a difference in shape given the size of the cups. Subsequent fittings continued to address minor fit issues in the cup and bridge due to minor synmastia (kissing breasts).
KEY DESIGN POINTS
Aside from having some bra drafting experience, using some basic math to determine the number of darts needed for those who have a sizable cup to underwire difference is a nice starting point. In general, the larger the cup, the more seams, the better. This is true in terms of support, in reducing the total wireline length and in minimizing darts/gather/wrinkles in the final cup. In the above example, I drafted darts that were 1cm (w) x 2.5cm (h) for ease but found that in practice, a dart 1cm x 2.5cm yielded darts that puckered at the tip. Reducing the width of the dart to 8mm (0.8cm) took care of the problem.
While the above sample was initially designed using the Shin method on computer, alterations were made using industry standards. That said, the omega alteration described above should work regardless of drafting method.

