
TUTORIAL - Front Close to Back Close - Koma Wireless
By popular request! Here’s a quick tutorial on how to convert the front close Koma Wireless to a standard back close. While a front closing bra is a great addition to any lingerie wardrobe, sometimes, you just prefer the standard back. Whether for a swim hack or fun summer top, we’ve got you covered!
Grab your pattern, a pencil and a ruler - lets get started.
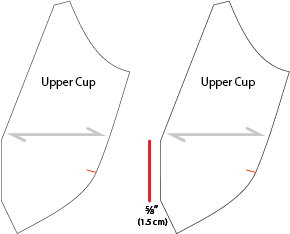
STEP 1 - Have the front Upper Cup or Longline Upper Cup piece (without seam allowance) ready. Draw a parallel line 5/8” (1.5 cm) from the center front (to account for the 3cm total gap).
STEP 2 - Extend the top and bottom lines of the pattern to match new line taking care to keep the center front seam length the same. Then add your seam allowances back on.

If you don’t need a back closure (best for smaller cup sizes), you’re done! Continue to Step 3 if you need/want a back closure.
STEP 3 - Have your Back Panel Piece ready.


STEP 4 - Remove 1.75” (4.4cm) total for the hook and eye. This means 7/8” (2.2 cm) on the back pattern piece where it says to cut 2 (Letter, A4 and A0) and 1.75” (4.4cm) where it says to cut 1 (Projector only).
Standard hooks and eyes are 2” wide, the 1.75” accounts for 12% negative ease.

Sew up the rest as usual (swapping out the Center Front Instructions with a single straight stitch) and you should get something like Helen’s version below.

Helena’s Longline Koma Wireless with a back close instead of front clasps.
For the longline version, the steps are pretty similar for the upper cup but slighly different set up for the cradle.

STEP 1 - Have the front Upper Cup or Longline Upper Cup piece (without seam allowance) ready. Line up the Center front of the upper cup and bottom band of the cradle so they are perpendicular (90 degrees). Draw a parallel line 5/8” (1.5 cm) from the center front (to account for the 3cm total gap) of the UPPER CUP.
STEP 2 - Extend the bottom line of the upper cup with a line perpendicular (90 degrees) to the new center front. Extend the neckline to the new center front seam.
STEP 3 - Extend the top and bottom of the cradle with a line perpendicular (90 degrees) to the new center front.
STEP 4 - Then add your seam allowances back on.