Tutorial - Using iDye Poly to Dye Bra Making Supplies
Today's topic is how to use iDye to make custom colors for your bra making adventures!
Idye comes in 2 varieties: Natural for (wool, cotton etc) and Poly for (Polyester and Nylon). The Natural series comes in 30 colors while the Poly has 16 colors. iDye Poly colors are mixable and in the 5 colors that I've tested, very bright.
The biggest selling point for this dye is that it comes in a dissolve-able packet - simply remove the packet and drop the whole thing in hot water. It is ridiculously easy IF you use the entire packet. Each packet contains 14gm of dye and can dye 1 - 1.3 kilograms of fabric. Quick division tells us that the recommended ratio is 1 - 1.4% dye to material (1000/14 = 1.4 and 1300/14 = 1.08). For ease. we will use the 1% ratio. This poses a problem for may home bra-makers - we don't often need to dye 1 kilogram of fabric in a single color at a time! For reference, 3 yds of 1/2" band elastic, 1 yd strap elastic, hook/eye, and 2 sets of rings/slides only added up to 36 grams (966 grams short of the recommended 1 gm of dye per 1000 grams of material for 1%.)! Rather than running out to buy a milligram scale, I searched the Jacquard Forums (iDye is produced by Jacquard) for a work around. [Incidentally, you could save yourself a lot of calculation with a milligram scale AKA diamond scale. Just weigh your materials, and multiply by 0.01 for 1% dye. For softer colors, you may need to multiply by 0.001 instead.]
According to the forum, you can use the packet to create a stock solution instead of working the messy powder for small batches. The following is a run down of what I did. Your numbers (and results) may vary if you used a different % for your stock solution.
MATERIALS
A suggested list of materials to get started.
- Large unlined pot (that means nothing teflon coated) like stainless or hard anodized
- Stir stick (long wooden spoons works well)
- Heat proof jars with water tight lid at least 1 cup in volume (as many as you have colors)
- Droppers
- Notebook
- Disposable Gloves
- Materials to dye
- Optional - Small disposable paper cups (no wax)
- Optional - Random plastic tray with high sides (like the type from Chinese take out) so you don't have to worry about knocking cups over
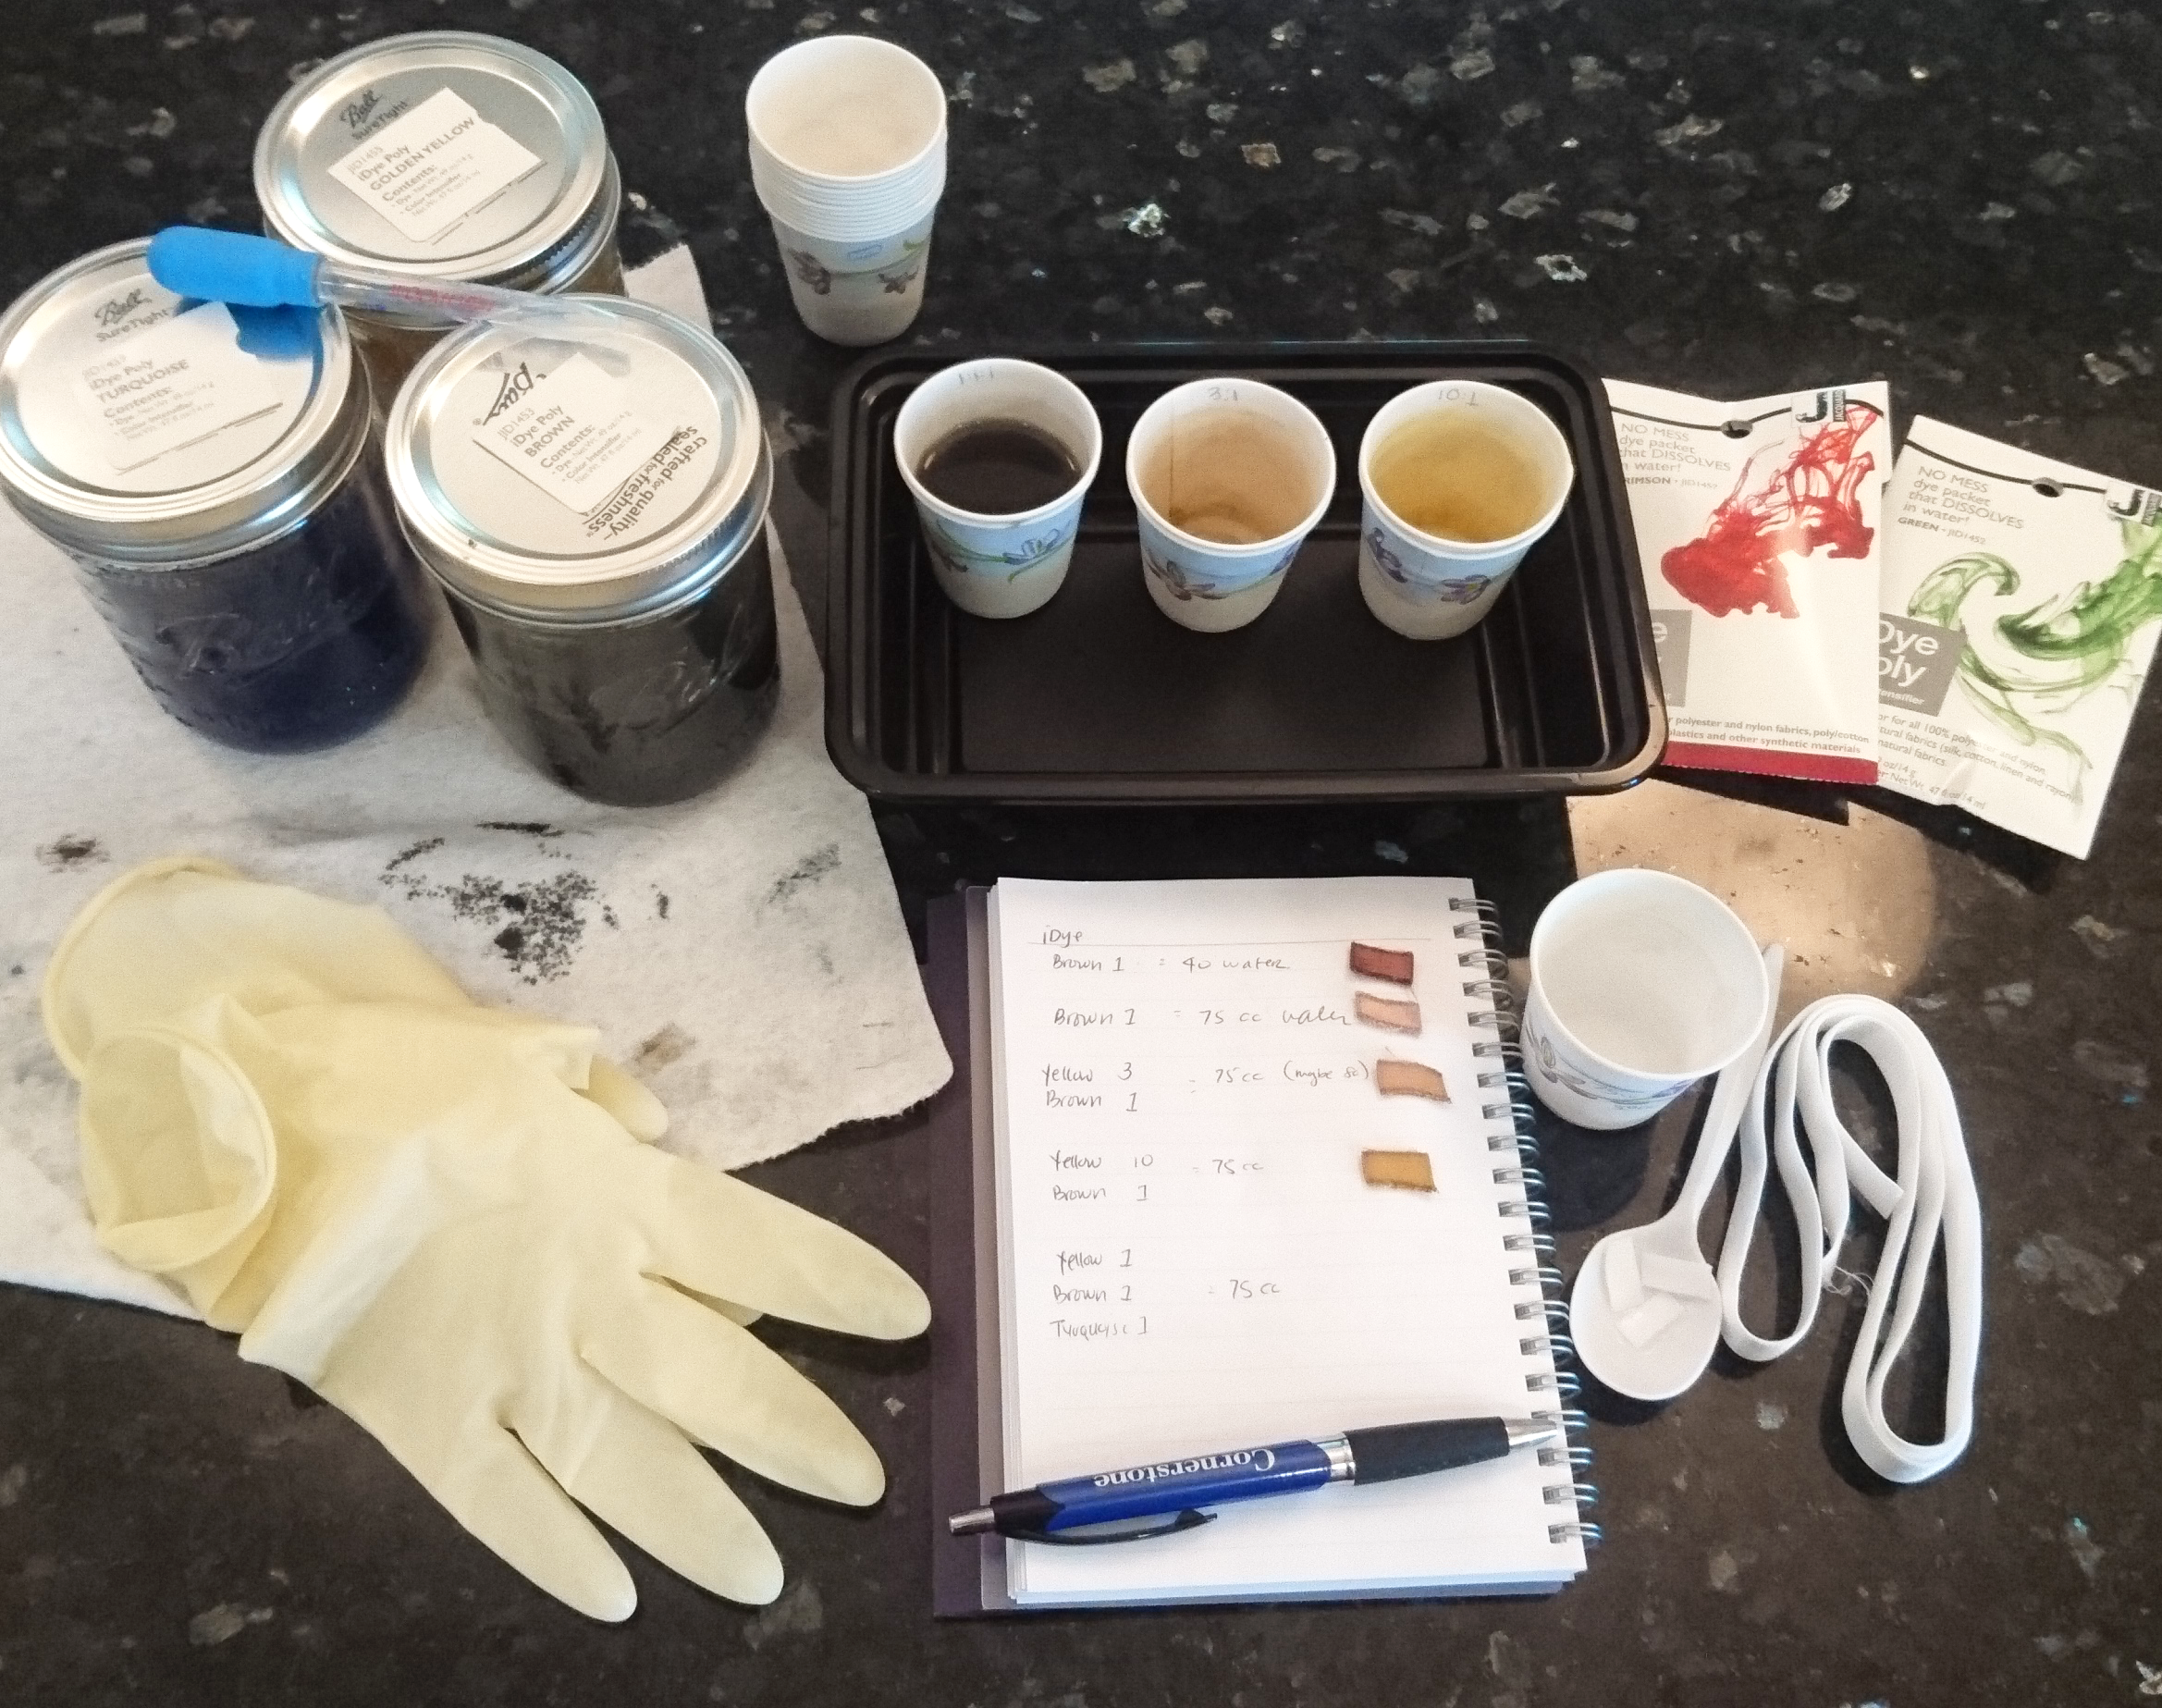
Materials used. Notice the simple notes and dye samples for my color experimentation.
It should be made crystal clear that any materials you may have "borrowed" from your kitchen can NEVER be used for food again. For this reason, it may be worth a visit to your local thrift store.
STOCK SOLUTION
Remove iDye packet from out packaging and place in a heat proof container. Canning jars work well (with a few caveats*) but know you will NEVER be able to use these for food again! Fill the heat proof jar with boiling hot water until it hits the 200 ml line (just under 1 cup). Close tightly and shake to mix. Your solution is now ready. This produces a 7% stock solution based on weight (14 gm dye/200 ml water = 0.07)
The iDye package has a flap that is conveniently sticky on the back. Cut off and place on lid! Or use a permanent marker.
*If your canning jar has a lid that comes apart into TWO pieces, I would suggest replacing them with the type that is only ONE piece. Stick with metal as it provides a tighter seal.
MATH PROCESS
Now that we have a 7% stock solution, we need to know how to use it. For ease, of application we will calculate the dye needed based on the original 1% per 1 kilogram of material then convert it to 100% Stock Solution then to 7% Stock Solution then to drops.
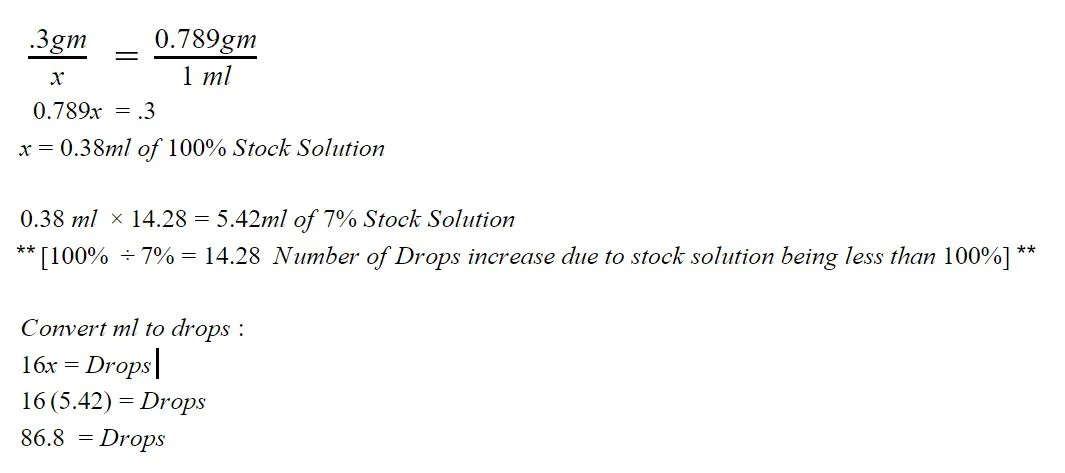
Ex. If the total weight of the materials to be dyed is 30 grams. We multiply that by the recommended 1%. (30gm x 1% = .3 grams of 100% powdered dye. Since there are .789 grams in 1 ml, you can set up an equation: .789x = .3 [or the formula 0.789 x = (gms of powdered dye). This gives us .38 ml. But the .38 ml assumes we are working with a 100% dye solution when we are in fact only working with 7%. Since 7 goes into 100% 14.28 times, we take that .38 ml and mult by 14.28 and get 5.4 ml of 7% stock solution (Number must increase as the solution is more diluted than the original).
For those who are more number inclined.
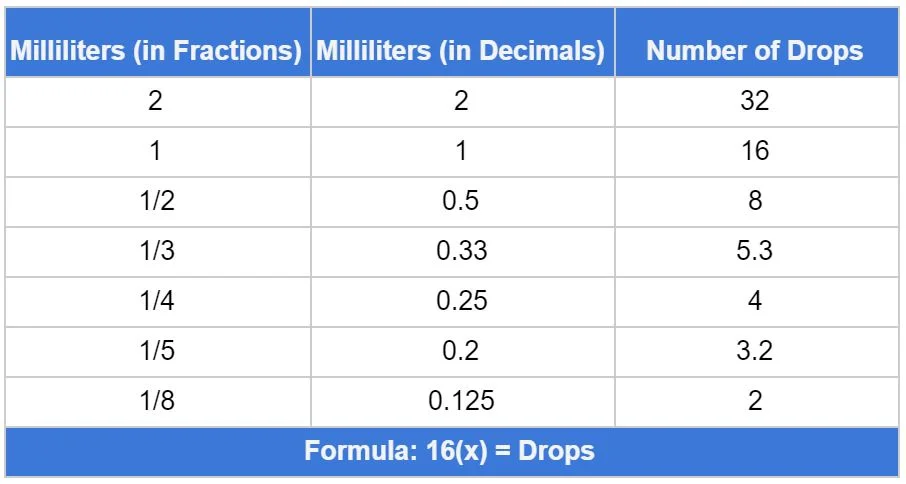
All that is left is to convert to drops (if you don't have a dropper with ml labels). There are 16 drops per 1 ml. As such 8 drops per 1/2 ml and so forth.
Based on the chart above [or the formula: 16(x ml) = # Drops], 5.4 ml is equivalent to 86.8 drops of 7% stock solution. If you love any of the 16 colors available for iDye Poly, you can stop here.
COLOR VARIATIONS BEYOND THE 16 iDYE POLY COLORS
For those who are looking to make colors beyond the available 16, I recommend choosing ONE color to begin experimenting with color saturation. For pastel colors, consider 10% of the recommended dosage of the 7% stock solution. For example 8.6 drops vs the 86.8 drops.
Keep notes with dye samples of the weights/percentages/drops used.
Once you've finished with the monochromatic study, you can try some color experiments by mixing colors. The key to mixing colors is to keep the same number of total drops. For example if I wanted a light blue green, I might begin with 7.6 drops of green and 1 drop of blue for a total for 8.6 drops. Again, keep notes with dye samples.
The disposable paper cups makes the color experiments much easier. Write on the cup itself what colors in what ratios it contains. Doubled up for heat insulation and sturdiness.
For those who like to work with REALLY light colors - think Eggshell or Champagne Pink, you may need to dilute a single drop of 7% stock solution. The easiest method was to dilute a single drop of 7% stock solution with, say 10, drops of water. Then put a SINGLE drop of that 0.7% stock solution in to the dye pot.
METHODOLOGY
General dye instructions can be summed up as: Boil water, add dye, mix well, add WET (as in soaking) material to dye pot, mix regularly for the duration of the dyeing time (usually 30 minutes but up to 1 hour for dark/vibrant colors).
For Monochromatic Experiments, I recommend beginning with a smaller % then increasing until you hit the recommended. If the recommended number of drops was 86, then start with 8 drops. Dye a few items and at the end of 30 minutes, cut off a small piece to keep in your notebook. You can staple it on with some notes on percentage, color, drops, time, etc. Repeat with 16 drops, then 24 drops, etc.
For Color Experiments, you can use disposable paper cups to get the general color. Say you want a dusty rose, try 3 drops of red and 1 drop of brown. Put the drops in a paper cup, then add hot water, mix well, add wet material (a small square is fine - I literally used 1/2" piece of strap elastic), and mix periodically for 30 minutes. The shade will likely be too dark but you can lighten it by diluting it (essentially a stock solution from a stock solution) before adding it to the dye pot.
FINAL THOUGHTS
To sum it up, dyeing involves alot of experimentation for the uninitiated. Certain fabrics dye better and/or faster than others. Some colors absorb colors faster then others (hence timing is also important). It may be a good idea to dye enough findings for 1 bra at a time. That way, you are guaranteed a matching set of findings when the need arises instead of wishing you had a matching hook and eye to go with the perfect shade of blue strap elastic.
The jars of stock solution can be kept in the jars indefinitely as it is a direct dye. Just shake it up before your next use and it should be good to go. It should be mentioned that while this method can also be used for acid dyes, the moderators at Jacqard specifically mentioned an expiration date for acid dyes due to hydrolysis. For this reason they recommend only making as much acid dye stock solution as you would use in 7 days.
****I do not profess to be an expert in dyeing and the above information is a summary of my experience. Your results may vary.****


